Install A Service
This walkthrough takes you from a service bundle to an installed service. You can start with Nginx to learn the steps, then use the same flow for other services.
Have These Ready
- An Ambari administrator account and a build that includes the service store.
- A service bundle supplied for that build, usually named
mpackstore.bundle.tar.gz. - Hosts registered with Ambari and the software sources they need to reach.
- The service's prerequisites, such as a database address, account, or Java runtime. Check the preparation list.
You do not need to unpack the bundle or copy scripts into Ambari's installation directory.
1. Open The Store
From a cluster page, click Management Packs near the top of the left sidebar. In the Chinese console this is 管理包. From the cluster directory, use the entry in the top navigation.
The service catalog is where you choose what to install. Imported packages shows what you have imported, and Activity shows the progress of store actions.
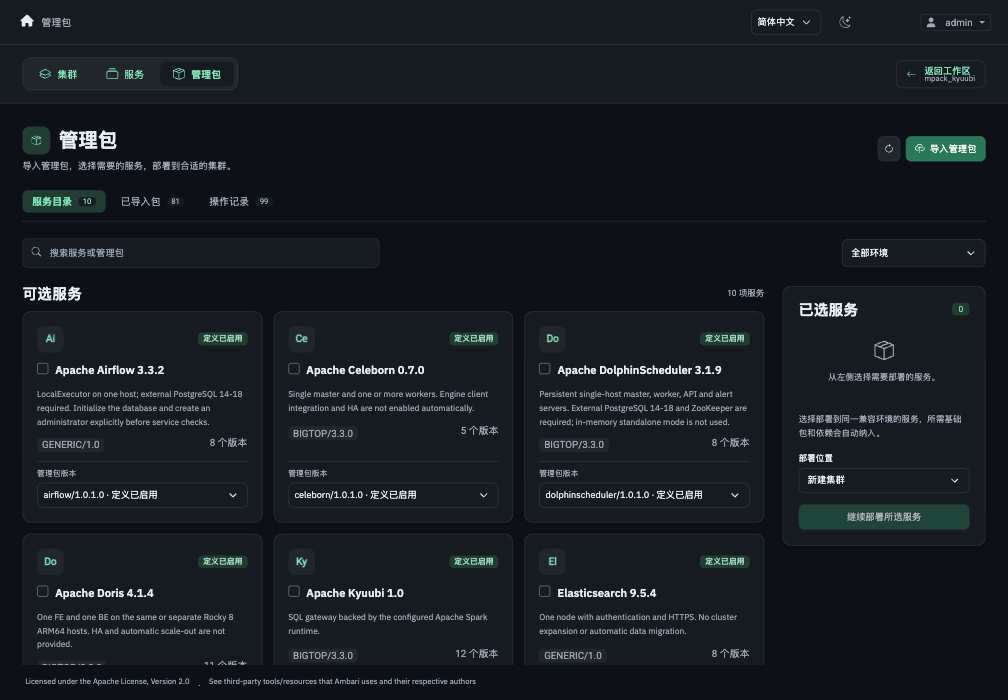
This screenshot uses the Chinese console in dark mode. The test environment's host names and version labels are examples.
2. Import Your Bundle
- Click Import bundle.
- Select
mpackstore.bundle.tar.gzand wait for the list of packages. - Check the list, then click Import Packages.
- Wait for the import to finish in Activity, then return to the service catalog.
After this step, the services are available to select. Nothing has been installed on your hosts yet.
If the file is rejected, check that you selected the service bundle, not a large software distribution archive. The default upload limit is 256 MiB. Ask the bundle provider for help if the file still cannot be imported.
3. Choose What To Install
Search for a service and select its card. Your selection appears in the panel on the right; remove anything you do not want.
If several package versions are available, choose the one recommended for your Ambari build. This version describes the installation and management instructions, not necessarily the version of the application. Check the service list for the software version.
Some services cannot be installed together in the same cluster. If a card is disabled, read its explanation and choose a compatible destination. Changing a search filter does not clear your existing selection.
4. Choose A Cluster
In Deploy To, select a compatible existing cluster or New cluster, then click Continue With Selected Services.
Ambari first makes the chosen services available for installation. If it asks you to confirm maintenance or a restart, read which clusters are affected before continuing.
Wait for this step to finish, then choose Create cluster or Add Services to Cluster to enter the installation wizard. An enabled service is ready to install; it is not running on a host yet.
5. Finish The Installation Wizard
- Confirm the services to install.
- Choose the hosts for each component.
- Fill in the required settings, such as software locations, database details, and passwords.
- Review your choices and start installation.
- Wait for installation and startup tasks to finish. If one fails, open its task details.
- Open the service page and run its service check.
For Nginx, check that the assigned host can reach its package repository and that the chosen port is free. Other services may need more preparation.
You are finished when the service is installed, running, and its service check passes. To change settings later, open its Configs page and follow Edit configuration files.
What If I Close The Page Or See An Error?
Return to Activity and check the original action before submitting it again. If the page offers an action to check whether the previous submission was accepted, use that first.
If store preparation succeeded but a host failed to install the service, open the installation task and fix that host's problem. Importing the bundle again will not fix a missing Java runtime or an incorrect database password.
See common problems and updates for the next step.